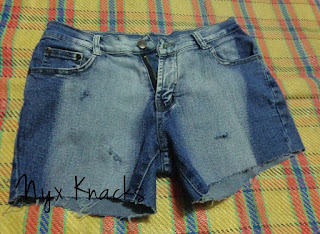
We all know the cycle. We see a new pair of pants. We buy it. We use it (sometimes even to the extent of over-using it). Then we overgrow it. But (there are times that) we don’t have the heart to give it away, or to throw it away.
Thus began the birth of pants being converted into different sorts of things. Bags, scrap fabric (This is a no brainer.), socks (I must say that I’m not comfortable with this one), and shorts.
This tutorial is easy-peasy~!
Materials Needed:
- A pair of pants (preferably old, or something that you wouldn’t mind having a re-fashion)
- Cloth Marker (or chalk)
- Ruler
- A pair of fabric scissors
- Pumice stone (optional)
Once you have all the materials needed, let’s start!
Step 1:
Wear your pants and mark where you would want to cut it with the help of your cloth marker. Lay your pants on a flat surface and mark the line for your guide in cutting. After marking, try it on yourself to check if your line is too short for your liking or too long. (Better to do a re-checking, than to be sorry.)
Step 3:
Once you’ve cut your pants, fit and make necessary adjustments. Noticed how the back part’s longer than the front? I don’t like to accidentally flash my butt cheek, that’s why 
And that’s basically it! You may or may not stitch the ends of your shorts, but if you want the threads to stay in place, stitch it 
Step 4: (optional)
If you want to add some definition to your shorts, you can opt to do some small holes. Or you can add embellishments. The options are unlimited. But during the moment that I did this, I just opted in cutting small holes.
Step 5: (optional)
If you also opted in doing holes, you may also grunge it to add more character. Using a rough stone or a pumice stone, rub it against the grain of the thread of your fabric.
You may also grunge the ends of your shorts.


No comments:
Post a Comment